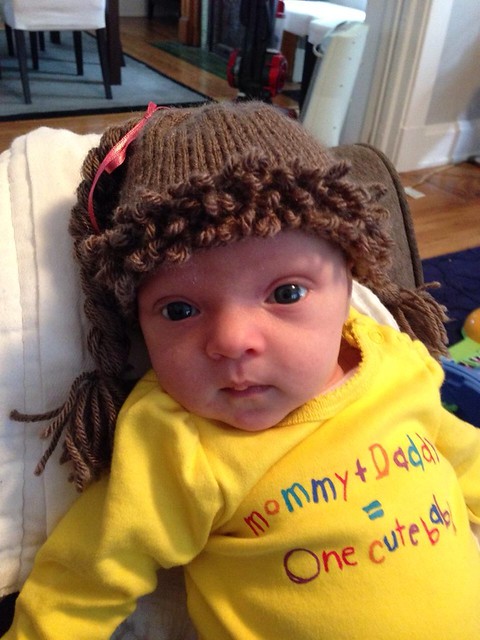
This cutie is Nora, the recipient of the hat, at about 3 weeks old.
Update:
All of a sudden lots of people are looking at this post (woo hoo!), so I wanted to add a few more details on the making of my knitted Cabbage Patch hat.
1. I wrote up the notes below with the assumption that they would be read (if at all) by fairly experienced knitters who might already have a favorite baby hat pattern. If you're more of a novice or you need a hat for a baby older than a couple weeks, I'd recommend starting with a generic baby beanie pattern (like this, this, this and this -- all free on Ravelry) and go from there.
2. I knit my hat on size 7 needles in the round with worsted weight yarn. I've knit baby hats using the pattern described below with DPNs and magic loop and both work fine, though I've come to prefer magic loop.
3. For the first several rows of the hat, I worked the ribbing (can be K1 P1 or K2 P2 ribbing, up to you) at the same time as I worked the loop stitch. The first 26 stitches of the round were loop stitch, the remaining stitches were ribbing -- you can't see it in the pictures, but the back of the hat is K1 P1 ribbing for the first five rounds. I thought doing three rows of loop stitch with a plain ribbed round between each looked best, but of course you can do more or fewer rows of loop stitch according to your taste.
If you have any questions, just leave a comment and I'll do my best to help! Thanks for stopping by!
***
Did you have a Cabbage Patch Kids doll growing up? I didn't -- I was never of a doll fan, preferring instead to give a home to dozens of stuffed animals -- but after doing some reconnaissance I now know that many of the dolls had huge mops of hair made out of yarn. Thus is the idea behind the new baby picture trend of Cabbage Patch crocheted (or knitted) hats.
I never would have come up with this creation on my own, but a friend of a friend is tailoring some jeans for me and asked me to knit her a newborn-size Cabbage Patch hat in return. There are a couple patterns floating around the web but they're pretty much all for crochet so I had to improvise. Below are some notes on how I knitted mine:
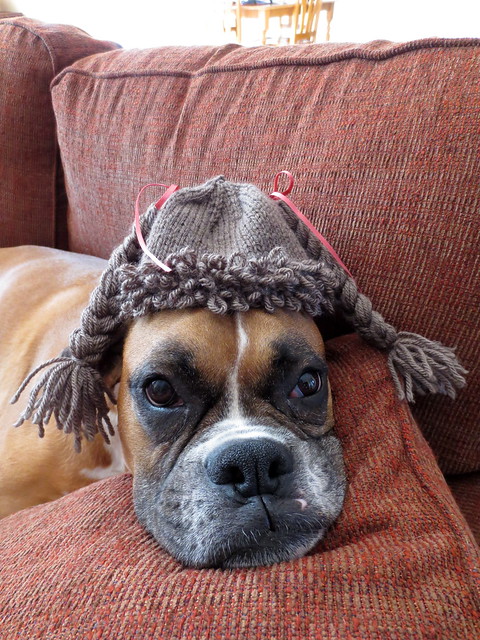
Conan the Cabbage Patch Kid/viking.
Hat:
Start with a basic beanie pattern. I knitted this newborn-size hat in the round using the magic loop method on size 7 needles and cast on 60 stitches. I started decreasing when the hat was around 3 1/2 inches long. My usual newborn hat pattern is entirely stockinette with a rolled brim, but I didn't want this brim to roll so I knit the first five rows in K1 P1 ribbing.
Loopy Bangs:
To make the bangs, I used the loop stitch. It turns out there are several ways to knit loops, but I found this technique and video from KnittingHelp.com to be the clearest. (*I used my index finger instead of my thumb to make smaller loops.) I wanted the bangs to take up almost the whole front half of the hat, so I did loop stitch for 26 stitches (30 would have been half). I did three rows of loop stitch with a plain round in between each (six rows total), then knitted the rest of the hat as normal.
Braided Pigtails:
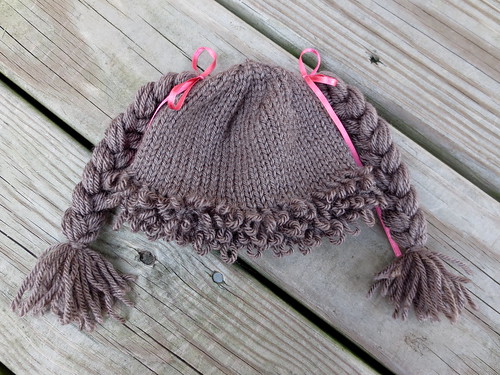
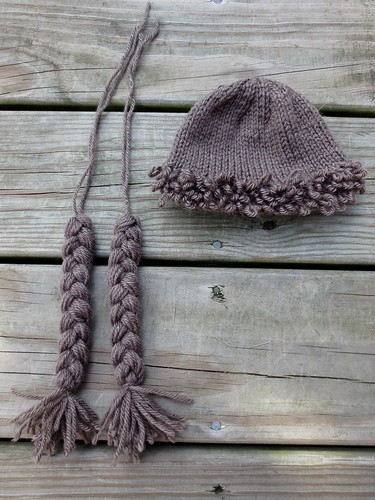
After I finished the hat, I made two braids (though I've seen other styles of hair, I thought the pigtailed braids were the cutest). I cut 19 pieces of yarn (about 16 inches long) for each, folded the yarn piles in half and knotted them in the center with a good-size length of yarn (what you see hanging from the tops in the photo below), then braided them while my husband held them still for me. I tied the ends of the braids with more brown yarn, then just cut it to match the length of the rest of the yarn ends. All that's left to do then is attach the braids (I marked the spots with safety pins beforehand to make sure they'd be even) and tie on some pink ribbon! (Here's a tutorial for making the pigtails... a bit different than I did mine, but without pictures I'm not sure how clear my method is. )
Here's what the hat looked like before I sewed on the pigtails.
At first I thought the whole thing was a bit odd, but the more I look at the hat the cuter I think it is. And I learned a new skill -- loop stitch -- which is always a good thing. I only wish I'd be able to see it on an actual baby, but the recipient is planning to give it as a baby shower gift. I may have to request that she get her friend to take a photo and send it on to me!


Love the picture with Conan modeling the hat! Too cute!
ReplyDeleteHi Lindsay,
ReplyDeleteI was wondering if you could answer a few questions for me.
1) I know how to decrease stitches, but I was wondering after the 3 12 in. long from the start, how many stitching did you decreased in each rows.
2) Do I understand corectly, that the ribbing and the looping are done at the same time?
3) Did you knit the hat 'in the round' or knit it straight across and then made a seam at the back?
Many thanks for coming up with this knitted pattern. It looks great!
Cheryl
Hi Cheryl,
DeleteGreat questions! It's been a while since I knit this and I wish it were fresher in my mind, but hopefully I can help.
1. I decreased every other row like this:
Row 1 of decreases: K4 K2tog, repeat around
Row 2 of decreases: K all
Row 3 of decreases: K3 K2tog, repeat around
Continue decreasing in that fashion until you've decreased to just a couple stitches, then pull yarn through remaining stitches and secure.
2. Yes, I knit the ribbing and loop stitches for the bangs at the same time. 26 stitches were loop stitches, the other 34 were K1P1 ribbing.
3. I knit the hat in the round using my new favorite method, magic loop. But of course DPNs work just fine.
If you use my notes to knit a hat, I'd love to see it! Let me know if you've got any other questions. Best of luck. :)
How do i do a bigger size ?
ReplyDeleteLindsay do you have a chart on how many stitches to start with for different sizes? Thanks Sandi
ReplyDeleteHi,
ReplyDeleteI’ve been brainstorming some topics that I think your readers would get a ton of value. Here is a sample of my blog http://littleknittingfairy.co.uk/knitting-craft-makes-comeback/
I’ll make sure the piece overflows with information that can’t be found anywhere else.
Cheers,
Joan
I love how creative and unique these Cabbage Patch hats look.
ReplyDelete