Showing posts with label Crafts. Show all posts

Saturday, October 24, 2015

Literary Fall Decor: Recycled Book Pumpkins

IMG_3478
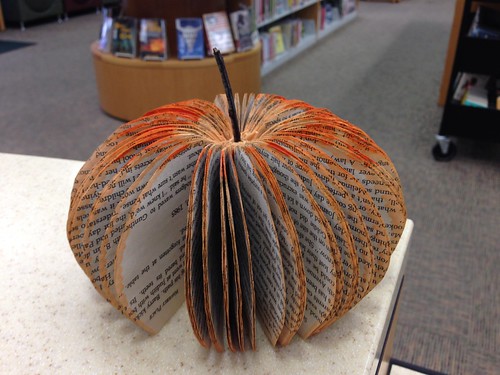
I love books and I love pumpkins. Combine the two and you've got some really awesome literary fall decor! The second I stumbled upon a tutorial for crafting pumpkins from recycled books, I knew it would be my weekend project. (Here's the tutorial I used.)
IMG_3469
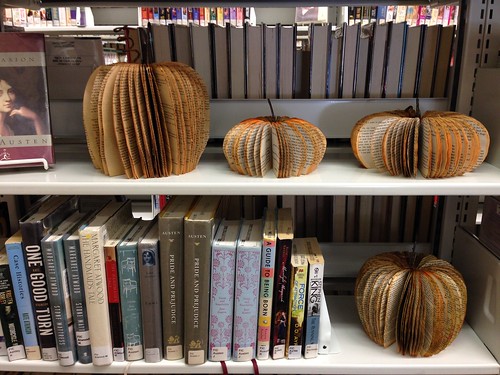
The library where I work has a book sale cart, and I selected three sad, lonely, dirty, worn paperbacks to get new life as Halloween decorations. Yes, of course I felt a little guilty about destroying books, but I'm 99% sure they would never have been purchased -- and even as I felt bad, I was happy to be recycling something that may very well have ended up in the trash. And now they're serving as fun fall decorations at the library, so their lives as books have come full circle.
IMG_3475
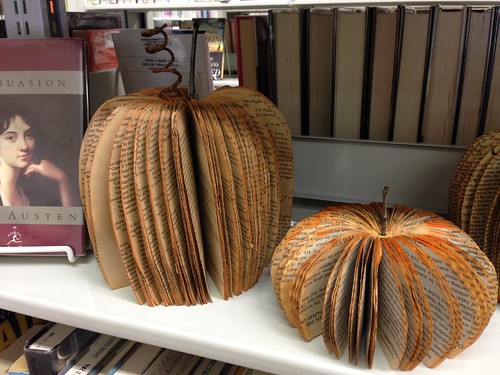
The stems are sticks from my backyard, the curly-cue vines are floral wire from Michaels, and  I colored the pumpkins orange by diluting paint with water and dipping the edges in, as suggested in the tutorial. I tried the ink pad method for my first pumpkin (the bigger one in the above photo) but I achieved much better color with the paint. And I used up my whole orange ink pad rubbing the pages, which was a bit of a bummer.

IMG_3476
Some tips if you decide to make your own bookish fall decor:
*Choose older books whose spines are already worn and broken-in. This will make it easier to bend the book into a circle shape.
*Use a really sharp (or brand new) Xacto knife blade.
*It took a while, but eventually I found a good method for cutting the pages. Cut about 15 pages at a time with a cutting mat separating those pages from the rest of the book (This prevents cutting pages partway and having to trim them up with the Xacto knife. And if you're only trimming one or two pages at a time, it's much easier to tear the paper, which is no fun!)
*It's ok if your cut edges aren't perfect -- you can even them up with scissors.
*The two smaller pumpkins were from the same book. I cut out a pumpkin from the bottom half of the book, making sure to keep the spine on the upper half in tact, then just tore it in half after I'd Xacto-ed my pumpkin from the bottom.
*It's ok to really bend and smoosh the book to force it into a pumpkin shape. It's not going to go willingly and you'll have to manhandle it a bit!
*After I dipped my pumpkins in paint, I used a paper clip to hold the two ends together. This helps keep the wet pages from sticking together and helps end the spine into a circular shape.

Monday, January 12, 2015

A Simple Winter Wreath

 DSCF5557
There's a weird decorating gap between Christmas and Valentine's Day. It's too late for red and green stuff, too early for hearts and Cupids. I never know what too put on the front door for those few weeks, so this year I decided to craft a winter wreath for January.

wreath
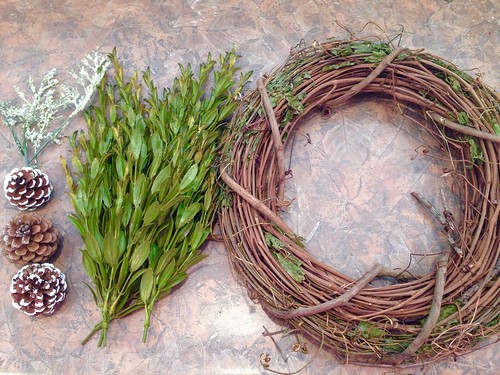
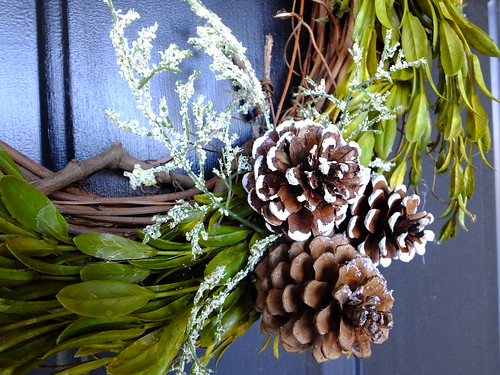
I started with a plain grapevine wreath, added some greenery, some whitery, and a few pinecones -- and there you have the world's easiest winter wreath! I also bought some purple and blue flowers in the same style as the white ones, as well as a wooden letter S, but in the end I liked the simple look.

DSCF5560
And the color scheme is perfect for winter -- right now when I look out my window, I see green shrubs, brown tree branches and white snow. I almost bought a little cardinal to perch on my wreath, but all the faux birds Michael's had to offer were in pretty sad shape (poor things!).

DSCF5559

Sunday, September 14, 2014

A Quick and Easy Fall Wreath With Burlap

DSCF4471
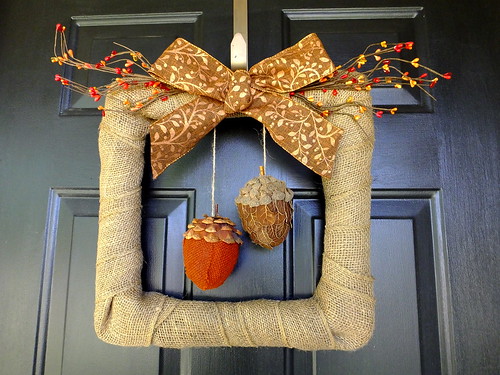
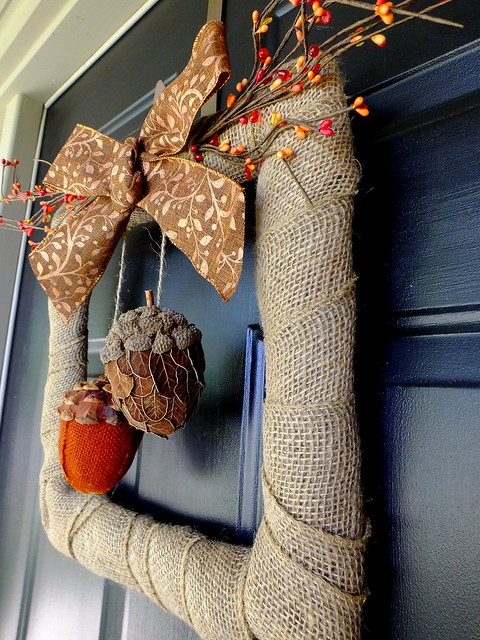
I went to JoAnn to browse around a bit over Labor Day weekend because I had a good coupon, and I snagged a cheap square wire wreath form. I figured I'd turn it into a festive fall door decoration since I've had my current fall wreath since college and it's looking a bit ragged.

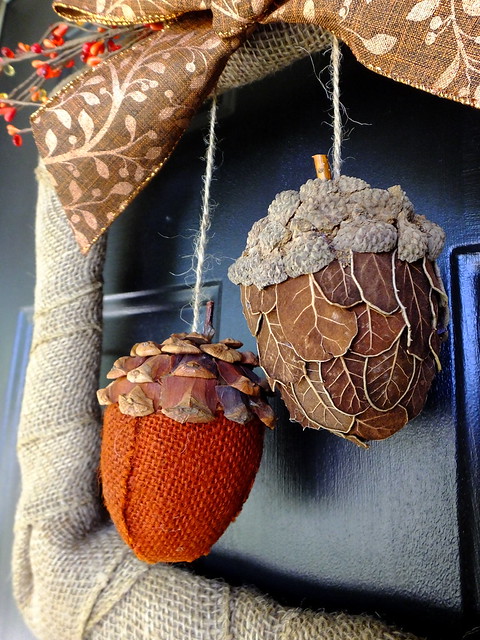
I already had a roll of burlap, which I thought would lend the perfect autumnal background for my square canvas. I knew I wanted something hanging down inside the frame, and I found those awesome acorns at Michael's. I really like the branch decorations (also from Michael's) because they have beads as well as those little styrofoam berries. I topped it off with a nice fall bow and was pretty thrilled with the result! The entire thing took all of 10 minutes to assemble. I spent far more time than that at Michael's debating about what accoutrements I wanted to buy for the wreath!
 
DSCF4472
I like the look of the burlap wrapped around the frame, and I was thinking it'd be easy to make a mummy wreath for Halloween this way, using a roll of gauze instead of burlap, and maybe some googly eyes. Perhaps that'll be my next project!
 
DSCF4476

Saturday, March 15, 2014

Quick and Easy Spring Wreath

DSCF2337
Today is lovely -- sunny, breezy and in the 50s -- and it seemed like the perfect day to whip up a new spring wreath for the front door. I needed something to adorn the door between Valentine's Day and Easter, so I popped over to JoAnn and bought a grapevine wreath and three stems of silk hydrangeas. After a few minutes of quality time with my glue gun, this pretty, cheerful wreath was ready to welcome visitors -- and the first day of spring, which will be here in just five days!
 
DSCF2338

Monday, November 25, 2013

Knitting FO: Holly Jolly Christmas Wreath

DSCF1162
Back in August I went to visit my best friend Katie in Dallas, and on the flight home I started brainstorming some knitting projects to pass the time. I came up with some pretty random ideas before I wondered: Why not knit a "sweater" for a Christmas wreath? And so I did!
 
DSCF1155
I bought a 12-inch foam wreath form, used a handsaw to cut through the form so I could slide my knitted tube on, taped it up and sewed the knitting shut. (Pattern and picture below.) I used some burlap, ribbon and hot glue to make a big eye-catching bow, and -- ho ho ho -- I had a festive holiday wreath!
 
DSCF1160
Here's a close-up of the simple cable pattern I used. It would've looked better with four sets of cables  or perhaps just one instead of three, but I wanted lots of ribbing so the knitting would be stretchy and hide as much of the green wreath form as possible.

(The only drawback to using burlap ribbon is that it sheds everywhere, as you can see!)
 
IMG_2714
After cutting along the seam in the wreath form, I had my husband help me slide the knitted tube on. I used some packing tape and toothpicks to secure the join, slide the knitting all the way around and sewed it shut. I planned to put a big bow to cover the seam in the knitting, but if you wanted to leave it unadorned you could do a provisional cast-on and Kitchener stitch it shut.

Pattern:
This pattern would be easily modified to suit any cable design. If I were to knit it again I'd probably just do one cable instead of three.

With size 6 double-pointed needles, cast on 33 stitches and join to work in the round. Repeat the following rows until the tube is around the same length as your wreath form's diameter. (I did 46 repeats.)

C4F: Put two stitches on cable needle and hold in front. K2 from left needle. K2 from cable needle.

1. K2 P1 K4 P1 K2 P1 (repeat 2 more times)
2. Repeat row 1.
3. K2 P1 C4F P1 K2 P1 (repeat 2 more times)
4-6. Repeat row 1.

Monday, October 14, 2013

In The Halloween Spirit: Knitted Candy Corn Garland Pattern

DSCF1123
Last weekend I was browsing Halloween DIY ideas on Pinterest and saw several crocheted candy corn garlands. I don't (yet) know how to crochet, but I was so inspired that I went to Hobby Lobby the very next day, bought some yarn, and created my own easy-peasy knit pattern.
 
DSCF1127_full
 
DSCF1125
 
DSCF1068
You can obviously knit these on any size needles and with any yarn you want, but I used worsted weight and size 9 needles. This yielded candy corns about 6 inches on the top and 6 1/2 inches on the sides.

With size 9 needles and yellow yarn, cast on 24 stitches.
1. knit
2. knit
3. k1, ssk, knit to 3 before end, k2tog, k1 (22 stitches)
4. k2, yo, k2tog, knit to 4 before end, k2tog, yo, k2 (if you don't want holes to string the i-cord through, just knit this row)
5. knit
6. knit
7. k1, ssk, knit to 3 before end, k2tog, k1 (20 stitches)
8. knit
9. knit
10. knit
11. k1, ssk, knit to 3 before end, k2tog, k1 (18 stitches)
12. knit
13. knit
14. knit
15. k1, ssk, knit to 3 before end, k2tog, k1 (16 stitches)
16. knit
17. change to orange yarn; knit
18. knit
19. k1, ssk, knit to 3 before end, k2tog, k1 (14 stitches)
20. knit
21. knit
22. knit
23. k1, ssk, knit to 3 before end, k2tog, k1 (12 stitches)
24. knit
25. knit
26. knit
27. k1, ssk, knit to 3 before end, k2tog, k1 (10 stitches)
28. knit
29. knit
30. knit
31. k1, ssk, knit to 3 before end, k2tog, k1 (8 stitches)
32. knit
33. knit
34. knit
35. k1, ssk, k2, k2tog, k1 (6 stitches)
36. knit
37. change to white yarn; knit
38. knit
39. k1, ssk, k2tog, k1 (4 stitches)
40. knit
41. knit
42. knit
43. ssk, k2tog (2 stitches)
44. knit
45. k2tog
Break yarn and thread through remaining stitch. Weave in ends.

I knit a really long i-cord on size 9 needles to string up my garland, but I toyed around with using different colors of yarn braided together, ribbon, and more. Ultimately I liked the look of the i-cord best. Since I used large needles, it really didn't take as long as I thought to knit several feet of i-cord -- in fact, I did most of it on the hour-long trip to and from the vet last Wednesday for Conan's chemotherapy. I'm glad I took the extra step as I think it gives the garland a nice finish.

Happy October!

Monday, April 15, 2013

A Springtime Wreath With Felt Flowers and a Mossy Letter

When I was at Michael's recently, I spotted a roll of burlap. I'd never seen anything like that at the (rather pitiful) craft stores in Hawaii and I just had to grab it. I decided to turn it into a wreath, adorned with a moss-covered letter a la Pinterest and a bouquet of felt flowers.
 
There are two kinds of moss available and I would recommend going with the overpriced version with a mesh backing -- which, unfortunately, I was too cheap to pay for. I ended up with the crazy-messy version but I think my S still turned out ok, and I was pretty happy with the finished product. It looks nice on the front door of our new home!


Saturday, August 25, 2012

DIY: Florida Gators Felt and Yarn Argyle Wreath

IMG_8890
College football season is nearly upon us, as is my husband's return from his deployment to Afghanistan. Born in Gainesville, Jarrod is an obsessive Florida Gators fan. I saw this pin for an Oklahoma Sooners wreath several months ago and just knew I'd have to make a Gators version to surprise Jarrod with.

To make my University of Florida wreath, I wrapped a foam wreath form in gray yarn, then made the argyle pattern with 2-inch felt squares. I really wanted to use blue instead of white but the craft store was out of royal blue felt at the time. Then I wrapped my blue yarn around the wreath twice, whipped up some felt flowers (thanks for sending the blue felt, Mom) and painted my wooden UF letters. It was super-simple and cheap, and now everybody on the block will know where our allegiance lies!
 
IMG_8895
 
IMG_8893

Monday, July 2, 2012

'Hoo' Had a Birthday?

When I realized that my best friend Katie would be visiting me in Hawaii over her birthday, I decided that I wanted to do something special for her even though it would just be the two of us.

IMG_8413
Katie is currently all about owls, so I figured I'd try my hand at an owl cake. I perused Pinterest for a little inspiration, then crafted this guy from a mixture of ideas from other people's owl cakes and my own imagination  lack of the right bowls to make a cool 3-D cake semi-laziness.

*I made a half-batch of cake batter and baked a single round cake, then cut off a small crescent to form the ear shape. (Which I then smothered in frosting and ate... And this epitomizes the reason I haven't gotten any skinnier while Jarrod's been on his deployment!)

*Normally I'm all about homemade, but I used store-bought vanilla frosting for this cake. I tinted some of it with red food coloring to make a bubblegum pink shade and frosted the body of the owl, using the back of a spoon to make the "feathers." Then I frosted his chest in white (for some reason, even though he's pink, I think of Mr. Owl Cake as a boy) and used a knife to press some lines on it.

*The eyes are Oreo halves and brown M&Ms, and the beak and feet are orange M&Ms.

I'm an extremely novice cake decorator -- my cakes always taste good but usually look like crap -- so I was quite proud of myself when I realized that I had actually managed to create a passable owl!

IMG_8401

IMG_8354
I also surprised Katie with a banner and some tissue paper pom-poms. For the banner, I simply printed out the letters on pink scrapbook paper and cut them out in circles, glued them to larger circles of white cardstock, then punched two holes in each and strung ribbon through. And I used this very helpful tutorial to craft the pom-poms. (I made half-size ones because it turns out that tissue paper is extremely overpriced!).

Monday, May 7, 2012

Baby Shower Cupcakes

IMG_7559
I actually made something inspired by a Pinterest pin! These cupcakes, which I baked for a friend's casual baby shower dinner, came out ok and they were definitely yummy. But there were two problems with them -- first, pacifiers are expensive, people! And second, it was a little weird eating a baby's face.

I did learn something new while making these. To acheive perfect flesh-tone frosting (it was a little darker in real life than it looks here), add one drop of red and one drop of yellow food coloring to one regular-sized canister of vanilla frosting.

Thursday, April 12, 2012

My 10 Etsy Purchases

I adore Etsy, I really do, and I could empty my bank account buying handmade jewelry, art and decor. But I'm also a bit of a cheap-ass so I scrutinize and ponder nearly every purchase for days before I finally click the "buy" button. That means, though, that each and every piece I've purchased from Etsy is one that I love. And, with the purchase of a gorgeous heart-shaped necklace made out of my husband's and my fingerprints, I reached 10 Etsy purchases! So I thought I'd share all these wonderful handcrafted works of art with you.

etsy1


etsy2


etsy3


etsy4


etsy5


etsy8


etsy6


etsy7


etsy10


etsy9

Friday, April 6, 2012

Handmade Cards Add Sunshine To Your Day

card1
A couple weeks ago at work, I was cutting out library card applications and hold request tickets. Once done, I had a mound of yellow and orange strips of paper left over and I just couldn't bear to throw them out. I bundled them all up and brought them home with me, already envisioning some sort of sunshine art project. And this card, to be sent to my deployed husband, is what came out! All it took was my free strips of paper (of which I have about 100 left over!), a piece of cardstock, a glue stick and a Sharpie. I hope it brings a little cheer and susnhine to Jarrod's day. :)

(Here's what I started with.)
card2

Thursday, April 5, 2012

A Crafty Swap: Knitted Mitts for a Gorgeous Clutch


IMG_7270
Despite the fact that we haven't actually met in person, LeAnn clearly knows me well. The adorable clutch she sewed me for our crafty swap has the perfect colors, shape and style for my taste! In exchange for the clutch (and the super-cute pin cushions below) I knit LeAnn some fingerless mitts.

IMG_7273
LeAnn and I met several months ago when she left a wonderful comment on a blog post I wrote about my disastrous showing at the craft fair. I felt compelled to track her down and thank her for her kind words, which really picked up my spirits. LeAnn (who at the time had a blog of her own about quilting) and I hit it right off. And after discovering that we have a truly freakish number of things in common, we started corresponding (very) regularly through e-mail. A little over a month ago, we both had the same thought at the same time (surprise, surprise) -- why not swap our wares? I'd knit LeAnn something and she'd sew something for me. We both quickly set to work, and a few weeks later I happily tore into a package from LeAnn. 

IMG_7268
As you can see, LeAnn's very talented at her chosen craft!

IMG_7213
Want to hear a few of the myriad ways LeAnn and I are alike?
-We both have a dog and a cat.
-We hail from Rocky Mountain states and both followed our husbands to new locales for their careers.
-Both of our names start with "L" and both of our husbands' names start with "J."
-We avoid wearing yellow and orange.
-We LOVE to read (although -- here's a difference! -- LeAnn loves her Kindle but I refuse to try out an e-reader).
-We have similar college degrees (journalism for me, English for LeAnn) that we're not using at our current jobs.
-We both love crafting and long-winded e-mails! :)
-The list goes on... and on, believe me! I'm so thankful to have found someone who is so similar to me in random ways as well as more serious ones. Our minds seem to be on the exact same wavelength!

IMG_7203

Tuesday, February 7, 2012

Knitting: Recent FOs

I've been busy knitting lately and I'm excited to share some of my recent finished objects with you! If you're a fellow knitter (or crocheter -- a craft I'm determined to learn one of these days), you can find me on Ravelry at knittinglindsay.

IMG_6732

IMG_6744
Ravelry pattern: Basic Ribbed Socks by Kate Atherley
Yarn: Plymouth Yarn Happy Feet, colorway 27
I'm happy to say I can cross something off my list of New Year's resolutions. Knit my first pair of socks -- check! My knitting and blogging buddy Veronica (visit her blog here) sent me this sock yarn for Christmas and it was the motivation I needed to finally attempt sock knitting. Which, as it happens, was waaay easier than I thought it would be.

IMG_6646

IMG_6656
Ravelry pattern: Saroyan by Liz Abinante
Yarn: Malabrigo merino worsted, colorway Stone Blue
My mom's birthday is in early January and I knit her this gorgeous (if I do say so myself) scarf from creamy blue Malabrigo. Incidentally, I'm wearing the shirt and earrings my mom got me for Christmas in this picture.

IMG_4848
Ravelry pattern: Tuesday Night Cowl by Susan Lawrence
Yarn: Malabrigo merino worsted, colorway Dusty
This cowl was a Christmas gift for my best friend Katie. It was the first time I ever knit with Malabrigo and now I'm hooked! Not only was the yarn soooo soft and such a pleasure to knit with, I'm in love with this pretty pink color. I have another skein and plan to knit something for myself with it. (P.S. I wanted to wear some sort of jacket to model this cowl so it didn't look silly with a short-sleeved shirt, and apparently this is the only real jacket I brought to Hawaii with me. And then I rememebered why I only brought one jacket -- about 30 seconds into picture-taking I was sweating like a pig.)
Related Posts Plugin for WordPress, Blogger...